


Post by richard on Jul 29, 2011 23:35:26 GMT -5
When I first got my 71 XS650 it had no seat, and at the time I couldn’t find one that wasn’t rusted to pieces, so I had one made for the bike, it worked well for a while, but on trips of over 100 miles it was kind of hard so I started thinking about building a better seat. I decided I wanted a seat with a gel insert built in and some better foam than stock. I started reading bike forums about seat improvements and found a source, Pro Pads, Inc. for a large gel insert. Earlier I made a seat for my 82 XS650 high density foam from an exercise mat I bought at Target for $29 bucks. It turned out very well so I figured to use the same foam again on my XS1 seat.
I bought a seat cover for about $50 from Dis-covers off of Ebay. This is the second cover I have purchased from them so I knew it would be ok. I ordered a gel pad kit 16 wide X 17 long from Pro Pad and bought an Embark Premium exercise mat from Target and a 22” X22” X 2” Nu-Foam pad from Jo-Ann’s which sells sewing supplies. I also purchased a can of 3M High Strength 90 spray Adhesive for about $12 bucks
I used a seat pan I bought from Craig’s list and repaired the rusted areas, then shot the whole thing with black spray paint.
So the plan was to build up the high density foam layer by layer until it reached two inches, then create a cavity for the gel insert. Once the gel was glued in place, I put on two more layers of high density foam followed by the final layer of 2 inch thick Poly fill Nu-foam which is much softer than high density foam cut from the exercise mat. To get the correct shape of the two inch thick Nu-Foam, I turned the seat cover inside out and used it as a pattern to trace onto the poly fill and used a Craftsman razor blade shear to cut it, the kind used for cutting hoses and ropes. It cuts poly-fill foam really well.
Once I had the seat foam built up, I used a coarse belt sander to smooth all the layers so they looked continuous and uniform with no bumps or dips. After that I wrapped the ¼ inch smoothing foam that came with the Pro Pad gel kit around smoothed edge of the seat foam.
I found it is best to trial fit the seat cover on the seat using a plastic trash liner or bag over the foam which helps it slide easily with no resistance. The seat cover is a tight fit so I leave it on the seat unglued for a day or so which allows it to stretch before the final gluing when I eliminate any wrinkles and put on a chrome strip at the bottom.
So in the end I have a seat with a gel insert that fits the bike better because of the OEM seat pan, cost a little less than an aftermarket seat, won’t absorb water and is a lot more comfortable than the original

So the I just glued the layer on and marked the foam where the gel went

I ended up with this much left over. the line are where it was cut. It's sticky stuff.

this is the 1/4 laid onto the side of the seat foam which was pretty smooth from the sander

I stretched the crap out of it with this and clamps under the seat you can see.

Front and back here also with clamps and bungie cords,because no matter how tight you get them they are never perfect.
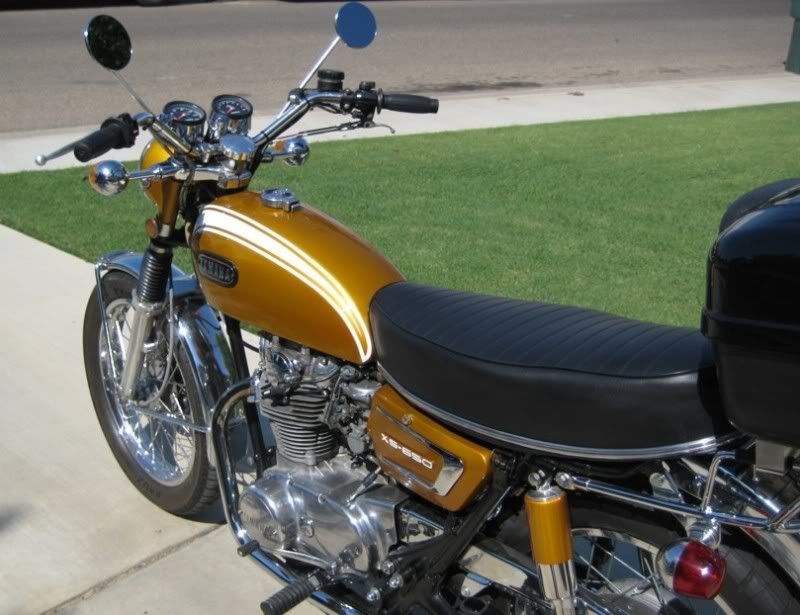
So here it is on the bike. Not vintage but a good compromise considering the comfort i've gained. Now all it need is to put on the 32 tooth sprocket and I'm set to tour the world. LOL :-)
The lack of pictures was due to my hands having spay adhesive on them. which is not too good for cameras.
I hope this was some help if any of you have thought of doing this. The seat is really pretty comfortable.
Richard
I bought a seat cover for about $50 from Dis-covers off of Ebay. This is the second cover I have purchased from them so I knew it would be ok. I ordered a gel pad kit 16 wide X 17 long from Pro Pad and bought an Embark Premium exercise mat from Target and a 22” X22” X 2” Nu-Foam pad from Jo-Ann’s which sells sewing supplies. I also purchased a can of 3M High Strength 90 spray Adhesive for about $12 bucks
I used a seat pan I bought from Craig’s list and repaired the rusted areas, then shot the whole thing with black spray paint.
So the plan was to build up the high density foam layer by layer until it reached two inches, then create a cavity for the gel insert. Once the gel was glued in place, I put on two more layers of high density foam followed by the final layer of 2 inch thick Poly fill Nu-foam which is much softer than high density foam cut from the exercise mat. To get the correct shape of the two inch thick Nu-Foam, I turned the seat cover inside out and used it as a pattern to trace onto the poly fill and used a Craftsman razor blade shear to cut it, the kind used for cutting hoses and ropes. It cuts poly-fill foam really well.
Once I had the seat foam built up, I used a coarse belt sander to smooth all the layers so they looked continuous and uniform with no bumps or dips. After that I wrapped the ¼ inch smoothing foam that came with the Pro Pad gel kit around smoothed edge of the seat foam.
I found it is best to trial fit the seat cover on the seat using a plastic trash liner or bag over the foam which helps it slide easily with no resistance. The seat cover is a tight fit so I leave it on the seat unglued for a day or so which allows it to stretch before the final gluing when I eliminate any wrinkles and put on a chrome strip at the bottom.
So in the end I have a seat with a gel insert that fits the bike better because of the OEM seat pan, cost a little less than an aftermarket seat, won’t absorb water and is a lot more comfortable than the original
So the I just glued the layer on and marked the foam where the gel went
I ended up with this much left over. the line are where it was cut. It's sticky stuff.
this is the 1/4 laid onto the side of the seat foam which was pretty smooth from the sander
I stretched the crap out of it with this and clamps under the seat you can see.
Front and back here also with clamps and bungie cords,because no matter how tight you get them they are never perfect.
So here it is on the bike. Not vintage but a good compromise considering the comfort i've gained. Now all it need is to put on the 32 tooth sprocket and I'm set to tour the world. LOL :-)
The lack of pictures was due to my hands having spay adhesive on them. which is not too good for cameras.
I hope this was some help if any of you have thought of doing this. The seat is really pretty comfortable.
Richard

